Pages

Friends

Monday, March 19, 2012

Win the traveling box... what I'm working on... and a paper piecing toot!

Hello Friends,
Here's block one done! I'm making this quilt - easy paper piecing - for the Hands 2 Help Quilt Challenge .  There is still time to sign up... Please use the link above to check it out, especially if you would like to win the traveling box that is ready now to send off. (You will need to leave an encouraging comment for Sarah, (you might even like to sign up for the challenge but that won't give you any extra points). Then come back here to let me know you've left a message for her. I'll put your name in a hat, and hubby will pick a winner, say on Saturday the 24th. (You may want to know that the box costs $15.45 to ship in the U.S., and you will be responsible to ship it on to the next recipient.) Sorry, but because of the exorbitant shipping price to foreign lands - only U.S. persons can play. Make sure I can get your e-mail address, so I can let you know you've won, and get your snail mail address. (Boy there are a lot of technicalities.)
This contest is now closed, as of March 24, 2012.

Paper Piecing Tutorial
Okay, back to the  quilt I'm making.  This is an easy paper piecing block I found in one of the magazines in the traveling box. It's 3 pieces that make a square that is on point within a square. 7 pieces in each block.


This is the pattern. (It's a 7", so bigger than I usually work on.) If you already know how to paper piece you might like to quit now.  You probably do it better than I do - I'm not real picky about the size of the seam allowances, which makes my way a lot easier.


First make a few patterns (keeping one as a master). Next cut a piece of fabric that you want to have in the #1 position... The fabric piece must be bigger than the #1 pattern piece by at least 1/4 inch all the way around. Put the fabric piece on the plain side of the pattern with the "pretty" side away from the paper and plenty of seam allowance on all sides of the #1 pattern piece. (Check it by looking through the paper to the fabric... hold it up against the light of window or lamp.) Pin it in place. (Check it again so it didn't move during pinning.) Here is the first piece in position and pinned.

Below it's pinned on the numbered side (where you are going to sew after you add the second piece.)


Add the second piece of fabric, "pretty" side  to pretty side on the plain side of the pattern.
Check to make sure that it goes over the line between #1 and #2 and is enough seam allowance. Holding both ends, turn to the numbered side and place under the needle. (Make sure you have the stitch length on about 15 stitches to the inch. Later you will need to have a secure stitch to allow removal of the paper.)  Back up stitch a couple of stitches, then stitch on the line between 1 and 2, back stitch a couple of stitches at the end of the line, too.
Here is a good time to turn on your machine!


Trim your threads.
Trim the seam allowances so there is enough. This is more important on smaller pieces, and when the newest piece is white. If you don't want shadows showing through white, trim the darker fabric to a smaller seam allowance than the white. - No kidding you will thank yourself for taking this one  more step.
Next - press the seam open.
Next add the 3rd piece.
Check to see that there is enough seam allowance, then sew as before. Trim your threads.
You don't want to cut the paper pattern, so sometimes it is easier to fold back the paper to trim the seam allowances. (See above and below.)


(Above the center 3 pieces are sewn on. Next the triangles.)
Line up the pieces so there is enough seam allowance, and the fabric is pretty to pretty. Sew on the lined side. Trim threads and seam allowances and press.
I use a strip of fabric, so I need to trim off the excess in order to sew the next triangle. See below.
Cut the fabric (above) so it leaves at lease a 1/4 inch seam allowance all around. I just eyeball it. You can trim to 1/4 inch later, but I don't sew paper pieces that way... I'll show that secret tomorrow.
Add the next numbered piece. (Should be #5.) Make sure there is enough seam allowance. Sew, trim, press. Add the next piece.


Below I have sewn the last pieces on and pressed.  Another block done.
The pic below was supposed to show the pattern side after the fabric (above) is all sewn on, but you can't see anything different than the original pattern. Trust me all the central lines have stitches.
Sew - now you start another block. I'll blog some hints and the secret I use to attach one block to another without relying on the old 1/4 inch seam allowance.

Now I know you are probably tired of hearing about this, Heaven knows we are all tired of cancer. My Chrissy (daughter) is undergoing major surgery on her liver tomorrow... (breast cancer metastasized to her liver) Tuesday early morning PST.  I sure would appreciate any prayers or good thoughts you could send her way. 

Ask for a Miracle!

Hugs,
Terri

Friday, March 16, 2012

Out and In and Bingo card

(I'm not getting old or anything, but I had to look at the pictures to see what this blog was all about.  Also, I hope you don't think I'm shouting, but I had to up the size of the type, so I could read it... another old lady thing!)

 I got a traveling box of fabric, books and patterns on Thursday! So I sat right down and checked it out.  I kept the books Luscious Landscapes and Scrap Quilts, a Dogwood Delight pattern, and about 2.25 yards of fabric (2 larger pieces and 3 fat quarters) all shown in the first two pictures below.


I added into the box the books Fabled Flowers, Art Quilts, and Quiltart: Curves Made Easy, 3 and 1/2 yards of fabric, and 4 butterfly squares and a pattern for applique fairies... I'll never do applique, not well enough to bother with the fairies.


That was fun!!!! Now I need to check in with Sarah to see who gets the box next.  I hope it's U.


On another note.... I finally finished my Bingo card.  Ta Dah...... 


The pieces represent:

Under the B: Blue daisies, Blue coated pirate, blue background baseballs, blue eyeballs, blue dragonflies
Under the I: yellow roses, yellow butterfly, yellow chicks, yellow background letters, yellow background stars.
Under the N: red background dog, red bricks, center space (black), red leaves, red cherries.
Under the G: green swirls, green leaves with ladybugs, green golf course, green background hearts, green swashes.
Under the O: purple bubbles, purple paisley, purple circles, purple triangles, purple polka dots.

I think this is the happiest I've ever been with a project I've made. The yellow and orange title piece came together so well... how did they know to make the color change along the lines of my columns?  I used letters printed out of the computer at 120 point and the enlarged by 142% to make the BINGO letters at the top... I traced them using my very excellent light table and filled them in later. I quilted in the ditch with black thread, and then pieced the binding in scrap orange pieces.  The ends went together without a hitch - I used to struggle with that, but now I've got it down to a science - no measuring, no swearing or crying. I wish my quilts were so fun and easy! (To Sheila, I know I said I wouldn't put the word BINGO on the top, but I changed my mind... woman's prerogative.)
If you'd like to participate in the BINGO thing use the second button on the right side bar. I'm kind of going at this blindfolded... we will see what it's all about.

Next on the "To Do List" is starting the quilt for Hands 2 Help Charity Quilt Challenge .... check it out to see if you would like to participate. Let me know if the button (there on my sidebar) works.
I have a pattern in mind, now to pull fabrics. (Shay, that's one of my favorite things!)

Hugs to you all,
Terri

Wednesday, March 14, 2012

plants, oranges, voodoo doll tutorial, roses

Hello again my Friends,
Today I have lots of pictures of my side interests... I've been playing hooky from quilting.

4 new jade plants and a Christmas cactus for the Halloween give away... See the yellow snowflake I made for my hubby.  (He likes my "artworks".)

The two oranges on the right are the size you might get in the store... although mine are still better because they are tree ripened (a couple of extra months on the tree... much sweeter!) The 2 on the left are some of the larger ones we picked, and the little fella in the center is a tangerine?  We've been told they are something else, but we call them tangerines. They are yummy.
The big ones are suitable for carving...
Handsome, nutritious and DELICIOUS.  None so far were woody either.


 Now for the Voodoo Doll Tutorial....  You know my daughter has cancer... and there is nothing I can do about it either....         
Anyway, a while ago I made her a cancer voodoo  doll.  Then I made one for me, too, because even though she has gone through so much the disease is back... So I'm taking some of my frustrations out on this:


Several views of it. It's the ugliest fabric I have, stuffed with some batting and tied round and round with the ends of the piece. I kick it, scream at it, punch it, stab it with the scissors, poke in pins, pinch it in a door or drawer as below. (I think the violence of my acts are frightening to the hubby, but I don't care.


It does seem to help me. I just wish it was helping my daughter. Die cancer cells, die!!!!

--------------------------------------------------------------------------------------------------------------------------


But now we can't end our blog on such a note. Today we went to Costco - that means pizza lunch, purchasing gas (it's a little cheaper there) and chocolate covered almonds.... and today....
2 dozen roses! One flower went into his bathroom and the stem was planted to try to grow this color. You can't see from the picture, but they are a gorgeous rust color... very different than a regular red, and this pretty yellow down below.
Better picture?  Notice on our kitchen (breakfast) table there is a paper plate of tangerine seeds?  That's what will get put into envelopes for Halloween seeds. Gotta start early.

Final picture is the stem being rooted... hopefully!
If it works out in a couple of years I'll make some more and offer those for Halloween, too.

No sewing today... I do have my bingo card almost finished, but for the hand stitching on the binding. I was so proud of the binding going on so easily... no problems. Some time I'll let you in on my (secret) method.

Thanks for stopping by.  Hugs to you all!
Terri

Monday, March 12, 2012

I hope you have noticed...

 Tuesday is the Master Sergeant's 40th birthday! This is why we called him the Turtle.
Happy Birthday Scot!


Hellooooo Dear Friends,
I hope you have noticed the two new buttons on my side bar.  (I finally figured out how to get them to stick, with the help of the blog  "Sew Many Ways" - look for that blog on my list and go there. She has lots of different tutorials on blogging... you may have to look for the list at the top.)

One of the buttons is strictly for fun. "May for Me" is a Bingo game and you can win prizes... first you need to make a Bingo card (a mini quilt)... well, use the button and go see how it all works. (Please let me know if the button doesn't work.)

The top button is a charity quilt challenge... make a quilt or two for one of the two charities. One charity is for grade school kids in the New Orleans area hit hard by Hurricane Katrina, and the other charity is for cancer patients.  You know that the second one is the one I'm choosing. There are prizes and other ways to participate all along the way... comments to leave, etc. So how about joining in? There is still time to sign up.  Again use my button and see if it works.... and please let me know if it doesn't.

Well, I'm off (like a dirty shirt) to go make a Bingo card, and plan my charity quilt for cancer (in honor of "you know who").

Hugs to you all especially the Birthday Man,
Terri (aka Mom)

Friday, March 9, 2012

YES! We Have a WINNER!!!!

Howdeeeeee!


I am so excited to proclaim the winner of the "What Block is This" contest!   The winning guess is

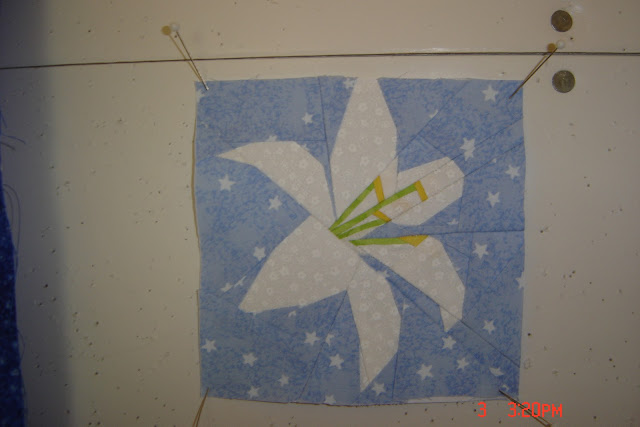
"Ok, here is my next guess, I guess that it is 'Lily'. I still like your blue background much better than the green one." by Cheryl of Cheryls Teapots 2 Quilting.

She was the first correct guess. She took my clues and went to Fandom in Stitches to look for the pattern.  That's just what I wanted you all to do.  So Congratulations Cheryl!!!  The Lily block is headed your way. That concludes the contest. Thank you to all who played. I appreciate your indulgence with my little game.
For those of you just tuning in, here is half of the contest square to identify. It was the last clue, I think.


And here is the finished block that Cheryl will be receiving:

It's not a real difficult block to make (not the easiest either). You can find a free pattern for it at Fandom in Stitches. Jennifer is the hostess and designer extraordinaire. She has all kinds of fan based designs like Harry Potter, Vampire, Sesame Street, SiFy, Sports, and more. These are just some of the topics, and she has directions for paper piecing, too.  So if you have ever wanted to try pp, go over there, or to her other blog, Sewhooked where she has more free patterns like hearts, that aren't part of a show. She also sells (quite reasonably) other original paper pieced designs you can use for personal or charity quilts and other items.

Well, that's it for today... I've gotta go pick all the rest of the oranges and tangerines quickly before the bees start to find flowers there to pollinate. I don't want to be gathering along with them.  Until next time.....
Congrats again Cheryl!!!

Hugs,
Terri

P.S. Please remember my Daughter, Chrissy, in your prayers today (and every day). She's been such a trooper, going through all the ways to beat the breast cancer and now it's a tumor on her liver to fight.....She can use all the help she can get!  Thank you!!!!!!!!!!!

Wednesday, March 7, 2012

Contest open until Saturday...

Hello dear friends,
I know you are just sitting on pins and needles, waiting to find out what block I'm giving away in my contest... well, I decided to leave the contest open until Saturday when I will reveal the block... but I'm hoping someone will guess correctly by then, and we can annouce the winner sooner.  You can guess as many times as you would like....
In the mean time I've got 2 more blocks done... one is Harry Potter, and the other is for a birthday card.
Here's the pics:

You can eliminate the bowtruckle from your contest quest. Here's the one I made, and you can plainly see that it isn't the contest block. (So there's another clue for you... it's not the bow truckle.)


And this is the block that went on a card... I won't tell you who it is for, but the close family will know who's birthday is coming up.

While crusing the blogosphere today I found a quilt made with blocks that I donated. If you'd like to see it, go to Confessions of a Fabric Addict. It's the first quilt pictured - the one with the blue border. They sure did a good job with the blocks. I am really pleased to see it there, and going to a young woman with cancer.... well they know what gets to me, don't they. (Please pray for my daughter. She is having low dose chemo now, in preparation for her next ( her 4th) surgery on March 20th.) Lately, anything cancer gets my donation, if I can manage it. 4patches4hope is another place to send some blocks... they only want 4 patches... well, go there and find out the dimensions and colors that they prefer. It's another cancer charity that will welcome a donation of pieced blocks. Who knows, the good will could help my baby, too.  A little good Karma sent out into the Universe... it couldn't "hoit". And please notice a new button on my blog. It's an upcoming chance to make a quilt for charity - there will be two charities, and one of them is to cancer people. Check it out! They haven't started yet so you have time.
Summing up -
1. check out and guess my block on the blog here.  Leave a comment with your best "guess" and you could win that block.
2. check out my blocks made into a quilt for charity here.
3. check out 4patches4hope
You have your assignments now, report back next time.

You all are my bright spots in life, right now.  Keep on keeping on!

Hugs,
Terri

Sunday, March 4, 2012

While you are thinking...

I know you are working out the clues I gave you on the last blog....

Meanwhile, I made a Hot/Cold pad for my Daughter.  It's a muslin bag of rice inside a Felix Felicis decorated bag.  Here's the "police" photos: (you know, one this way, and one that way)

This is the first bag of rice I made.  Then after sleeping on it - not on the rice bag, but on the aftermath of making it - I realized that the glue that I used to put on the heart might leave some nasty fumes and scum in my daughter's microwave.  Can't have that!  So I made a second bag, without the glue, and unfortunately without the heart.  Sorry Honey, but you can see we were thinking about you. Sew the real one is going out without glue!


Once the rice bag is inside the blue bag there is a flap that comes over (from the left in this pic) and attaches to close the outside bag with Velcro.  (Already done!)


(You can see the flap on either side!  It was my own design, and I didn't take into account that the front would bulge out from the rice bag... well, it was my first one.) This is the good luck side - place the liquid luck on your boo-boo.  It can be used cold from the freezer (freeze for 2 hours before using) or hot (from the microwave on high for 1 or 2 minutes) depending on what kind of boo-boo you have. Consult with your physician.


You remember the "correctly colored" FF... This is where it went.

Remember to leave your guess - I gave you lots of "cheats" - on the previous post.  You might win a Harry Potter paper pieced block.

I'm linking this up to Sew Darn Crafty Party, sorry I just can't get the directions for copying her button.  I'll have to try again, some other time.


Have a wonderful Sunday.... Remember to pray for my Daughter!! and now add all those homeless people created by the tornadoes.  They, too, are going to need all the help they can get.

Hugs!!!!
Terri