Again another paper piecing tip - I could have tried, would have used... (insert title here).
Go over to Cose que te Cose. It is in a foreign language, but I've copied the address with the translator in it, so it should translate for you. (It did work that way when I tested the link.) (It's a bit hard to read the translation - different languages are set up in different ways) Don't worry about the thing that says it can't be found - just scroll down and it's there.
She made this wonderful Poinsettia flower and sewed it together as a paper pieced pattern, but didn't sew through the paper; she sewed next to the folded paper pieces!!!!!!!!!!!!!!!!!!
I am super excited to try this method. I still have to work the Kisses quilt, and the paper piecing is all done, so I can't try it right now, but if you do, please let me know how you liked it.
Hugs,
Terri
Saturday, January 11, 2014


Friday, January 10, 2014
Show off your pincushion - Grandma's Pincushion (a half-way tutorial)
I've always wanted to share some pictures of my Grandma's Pincushion. She made a bunch of them for the bazaar at her church - along with hemmed dish towels and other sewn items. (Her quilts inspired me to try making some.) This pincushion is Genius - in my mind.
Exhibit A:

 Knit with tiny needles - #1 or 2
Grandma used some really thin (2 or 3 ply) yarn - probably leftovers from the knitting mill in town.
She knit a rectangle, folded it in half and fit it around a thimble. (The rectangle was about 2.5" wide. You will have to measure it up to your thimble for the length.) Then another color combo (blue and white) knit to go around that, and then another (reds) rectangle folded to fit around the whole thing. Each is pulled tightly.
Then on the bottom a circle of felt - probably glued on and stitched with big stitches to hold the felt on. (No filling needed!)


Exhibit A:
Grandma used some really thin (2 or 3 ply) yarn - probably leftovers from the knitting mill in town.
She knit a rectangle, folded it in half and fit it around a thimble. (The rectangle was about 2.5" wide. You will have to measure it up to your thimble for the length.) Then another color combo (blue and white) knit to go around that, and then another (reds) rectangle folded to fit around the whole thing. Each is pulled tightly.
Then on the bottom a circle of felt - probably glued on and stitched with big stitches to hold the felt on. (No filling needed!)
I've used it since 1974... without a smidge of trouble. The thimble fits in the center, and it accommodates (probably) hundreds of pins. You can even put in a nail between the knitted rings and it stays put. Sew in the world of wondrous pincushions - I have the best one.
Now show off your favorite pincushion - if you dare. LOL
Have a wonderful weekend!
Hugs,
Terri
Sunday, January 5, 2014
Blue Blocks and Rearrangement of Kisses
I wanted to get in on the Rainbow Challenge this year. I made these blocks to enter. (I hope the linky is still open.) I like the blue sooo much that I might just make a whole quilt of the blue with yellow or white stars. I've got lots more blues that I didn't include here.


Here are the rearranged blocks for the grandgirl quilt. I subbed out a few really bright ones. I wanted this quilt to be lots more subtle than it is, but I have to have variety when I sew, so...
So look for me at the Rainbow Challenge 2014 - link in the side panel.
Hugs,
Terri
Saturday, January 4, 2014
Link to an easy Kiss!
If you would like to make XX and/or OO without paper piecing, try this link Canoe Ridge Creations.
While following a lead from another blog I found this tutorial. So much easier than the paper piecing. Wouldn't you know I finished the blocks yesterday. Today I'm rearranging, and tomorrow I hope to start sewing the blocks together. That's my kind of timing finding an easier way when I done doing it the harder way. Oh well. Hope this find helps you out.
Hugs,
Terri
Monday, December 30, 2013
Making Kisses
This title reminds me of my daughter at about 3 years old. She would wiggle her lips around and then give a kiss... she had to make one first... She was a character right from the beginning. So in memory of my darling daughter we will make some kisses for the niece she will never know.
Start with a pattern you can get for free at:
QuiltMaker Magazine
Theirs is for 6" blocks and I made mine smaller and made up a Master sheet so I could make copies of it and save some paper.

 Cut your copies into single blades (1/2 of a kiss).


 Seam sewn - trim seam allowance to 1/4". (I use a scissors - and eyeball it. It's much faster that way.)


 Then press the seam (to set your stitches) and flip the #2 piece and press again

 I make the two pieces at one time... it's faster that way.
Now the #3 piece. Sewn, seam allowance trimmed, pressed, flipped and pressed again. I usually put a pin in this tail (top left) but I didn't show that part on a picture.
 Now sewing on #4. Here's that pin. .. to hold that tail from floppy around.


Here's our block on the design wall... just pinned - not yet sewn together. I might want to mix them up a bit before I sew.


Start with a pattern you can get for free at:
QuiltMaker Magazine
Theirs is for 6" blocks and I made mine smaller and made up a Master sheet so I could make copies of it and save some paper.


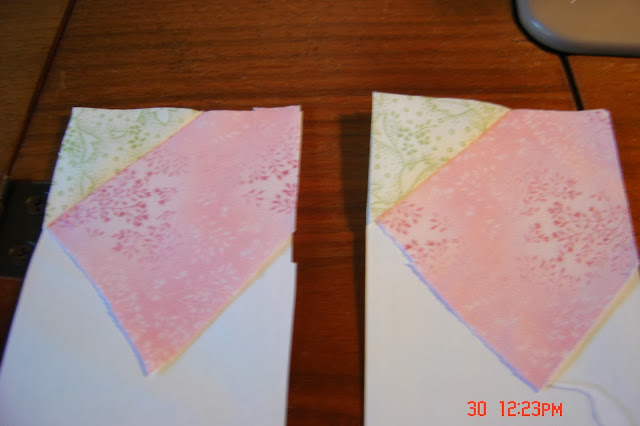
Start by choosing your colors and pinning on #1. (#2, 3 and 5 are background pieces. #1 and 4 are kiss parts.) I'm using pink or white for the kiss parts.
(Make sure the #1 piece is pretty side out on the unprinted side.)


Place the #2 piece, (green and white print) face up, and leaving enough seam allowance. Set your machine for small stitches. (On mine I use 15 stitches to the inch.) Now back stitch at beginning, sew along the line, then back stitch at the end of the seam. Easy-Peasy.


Now trim off the strip of #2 fabric... Never trim until it is flipped.


Now the #3 piece. Sewn, seam allowance trimmed, pressed, flipped and pressed again. I usually put a pin in this tail (top left) but I didn't show that part on a picture.


When your two halves are done you can make hugs, or turn the pieces around and....

make a kiss.

Here's our block on the design wall... just pinned - not yet sewn together. I might want to mix them up a bit before I sew.


(27 more blocks - 54 more blades to go)
The block just made is the lower left.
Linking up to Confessions of a Fabric Addict... see the sidebar for the location.
Next time I'll show my technique for sewing the blocks together.
Hugs, (and kisses)
Terri
Thursday, December 26, 2013
More XXXs

I need 9 X 9 to get a crib sort of size.... 81 blocks. Doesn't sound like much, but when it takes more than 10 minutes each - that's at top speed, which I just can't keep up - Well, I figured I'd better get to the grind stone...... and yet a nap sounds so lovely. We're still under the weather here. So not much sewing getting done.

Hope you all had a wonderful Christmas. We got a call from our son in Alaska, and got to talk to the whole family! That was really special to us. Thank you.
Now on to New Year's! Anybody making a Resolution List yet? (I need new resolutions... seems the ones I usually go for are just not meant to happen. LOL) What's your most unusual resolution?
Hugs,
Terri
Wednesday, December 25, 2013
Merry Christmas to you all!
A few Christmas greens from our garden.
 In amongst the cards...


An arrangement at the kitchen window - see the little red roses that didn't freeze!!! and the red berries, too.

on the coffee table an arrangement of pine cones and greens...

and a vase of lavender and red leaves... smelled so good while handling.
Hope you are having a wonderful day ...
Hugs,
Terri
Subscribe to:
Posts (Atom)